GDPR compliant website analytics with Umami (incl. OpenTofu/Ansible in Hetzner Cloud setup)
Dive into Umami, an open-source and GDPR-compliant Google Analytics alternative, and explore web data analytics with dashboards and reports. A detailed setup guide with OpenTofu and Ansible in Hetzner Cloud is included for self-hosted environments.

I have used Google Analytics for many years to get an insight into page views and visitor geography. With the importance of GDPR compliance, cookie banners have become a requirement. I often asked myself: What am I doing with the collected data, and is it worth the cookie banner effort?
Short answer: Not much, and no. Long answer: I'm interested in learning the topic interest from my readers in different regions, for example, me learning AI in public.
After Daniel Bodky shared alternatives to Google Analytics, I was sold on trying out a more lightweight approach: Umami.
Umami makes it easy to collect, analyze, and understand your web data — while maintaining visitor privacy and data ownership.
This article shares how to get started with Umami, dashboard and configuration insights, and integrations into MkDocs, Ghost and Hugo based websites. If you are interested in self-hosting Umami, the setup in Hetzner Cloud using OpenTofu and Ansible is described in detail at the bottom.
Umami Overview
The next sections describe how to get started with Umami, add websites to collect data, explore the dashboards and detail view, and more configuration and integration options.
Get Started with Umami
To get started quickly, you can start with the SaaS free tier, or run the docker-compose setup in a cloud VM. Embedding Umami into public website code requires a public web server host where it connect to.
Open Umami in your browser, and log in. You are greeted with an empty dashboard, and need to configure data collection first.
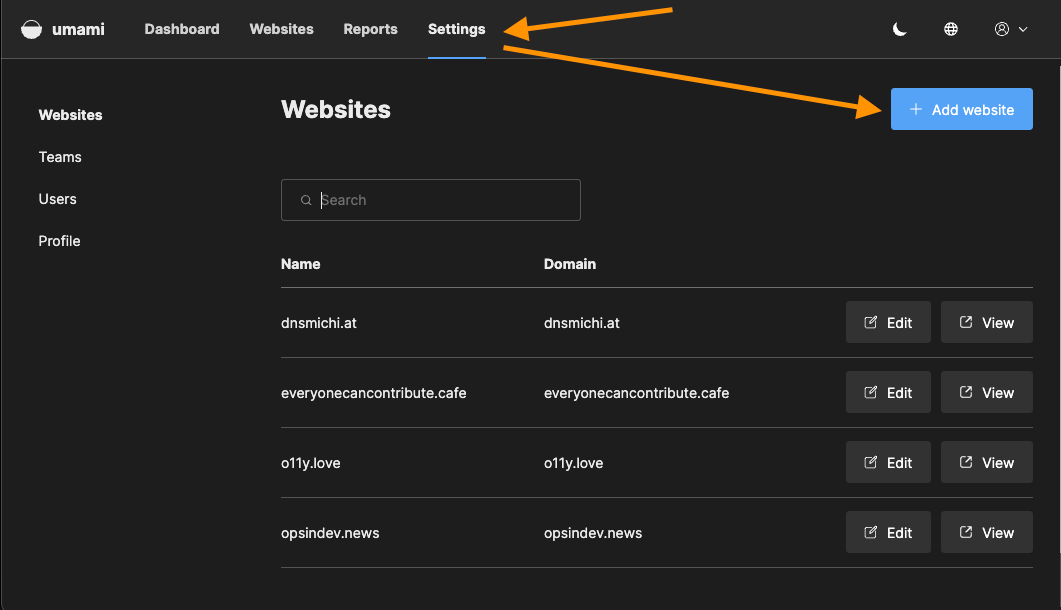
Add a website and collect data
Navigate into Settings and click on the Add Website button. Fill the name and domain entries and save.
Next, click on Edit and navigate into Tracking code to get the JavaScript integration snippets for your website.
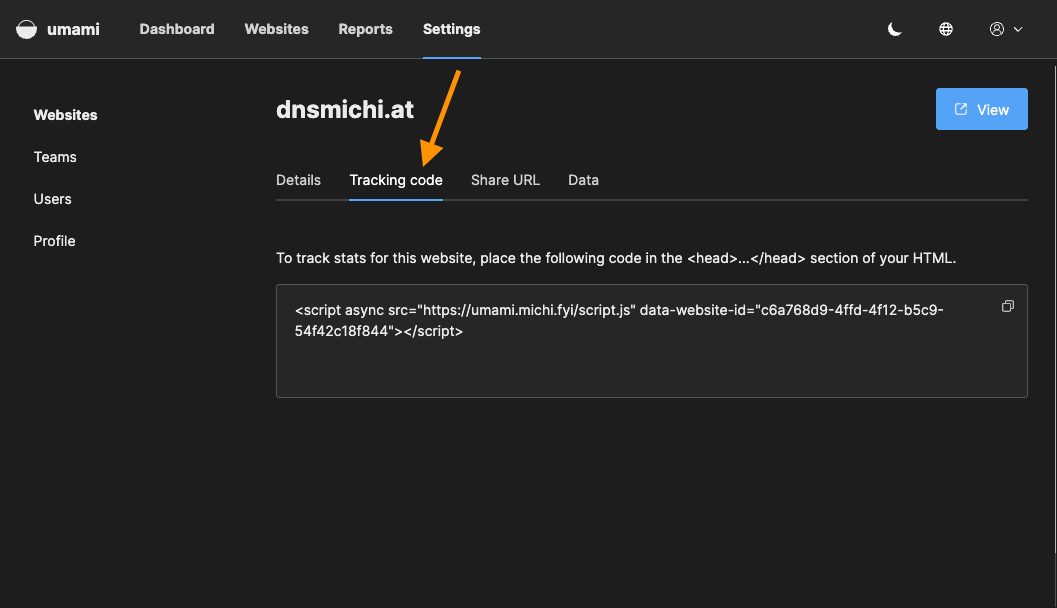
Add the tracking code into your website's <head> section, and save. Open the website in a second browser window, or run a few curl commands on the command line to simulate users.
Navigate back to the Umami dashboard to see the new website, and its data.
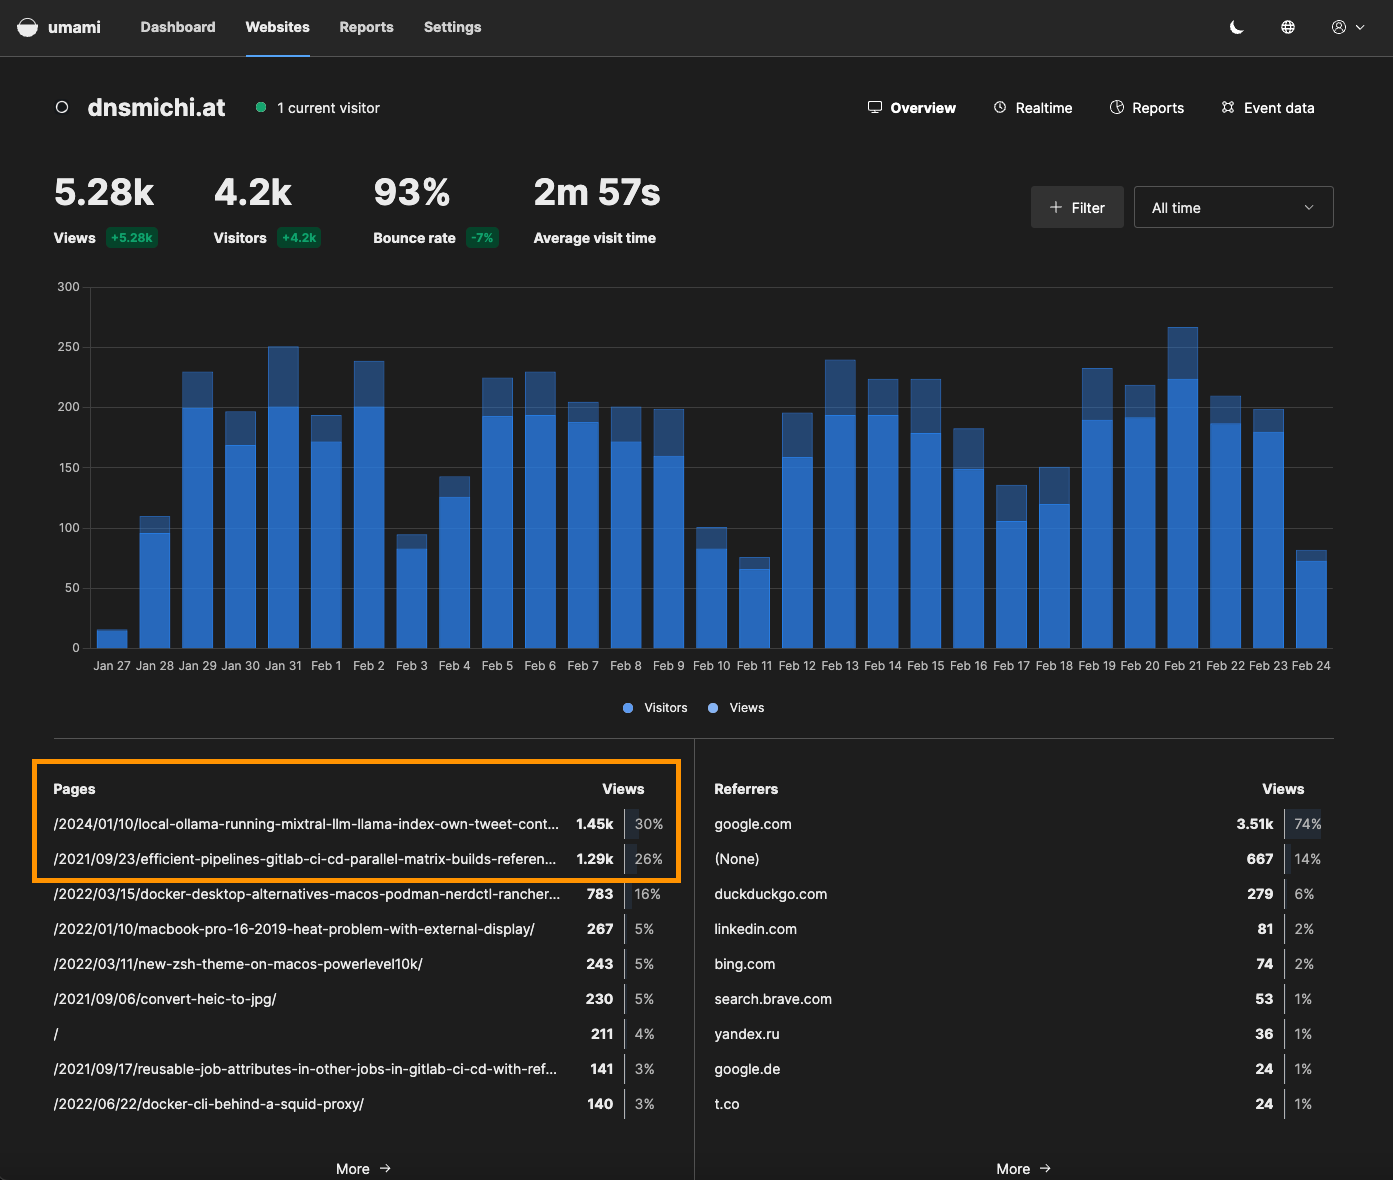
Dashboard
The dashboard provides an overview of all configured websites and quick range selectors. Click on Edit to enable a view to change the order with drag and drop.
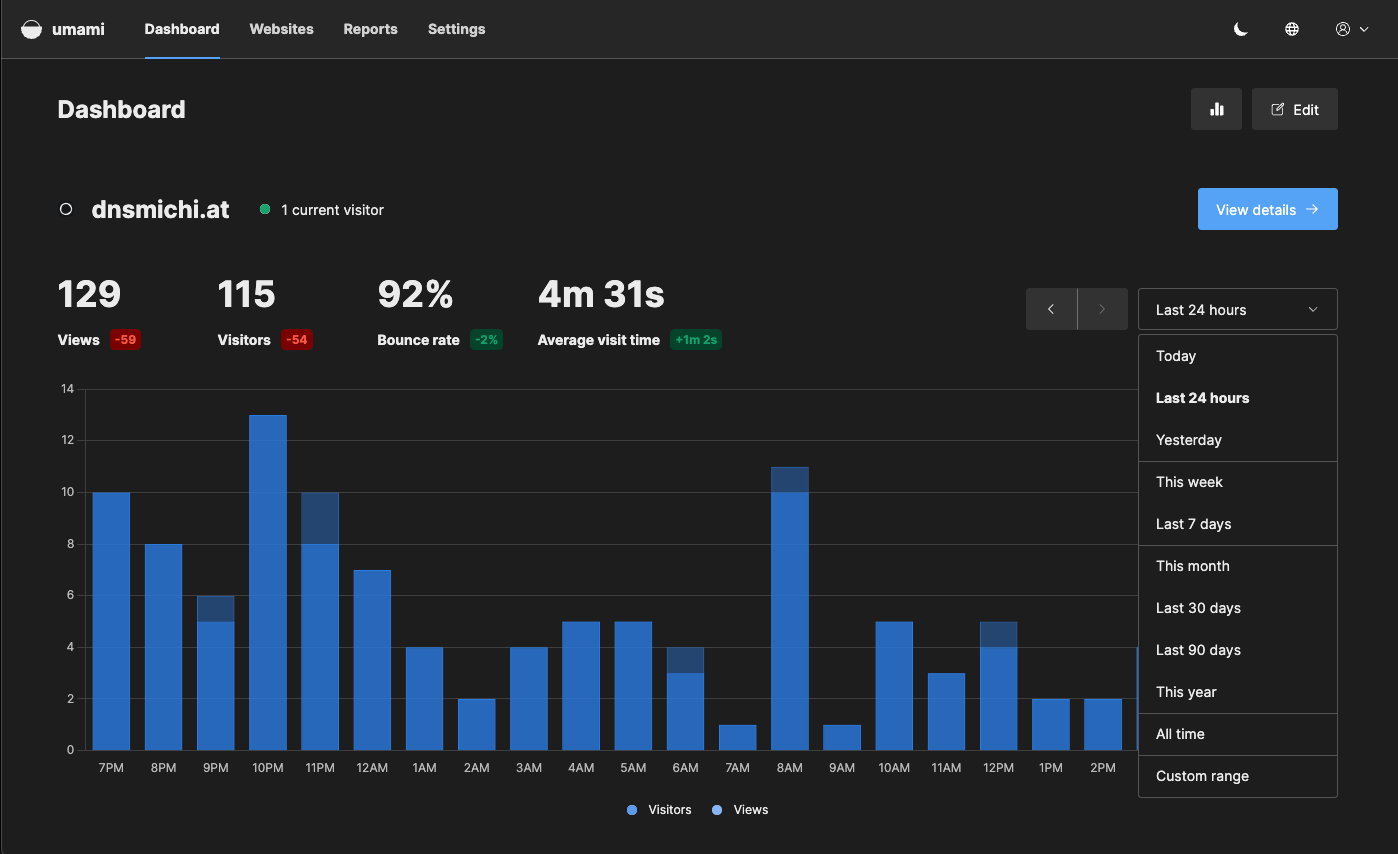
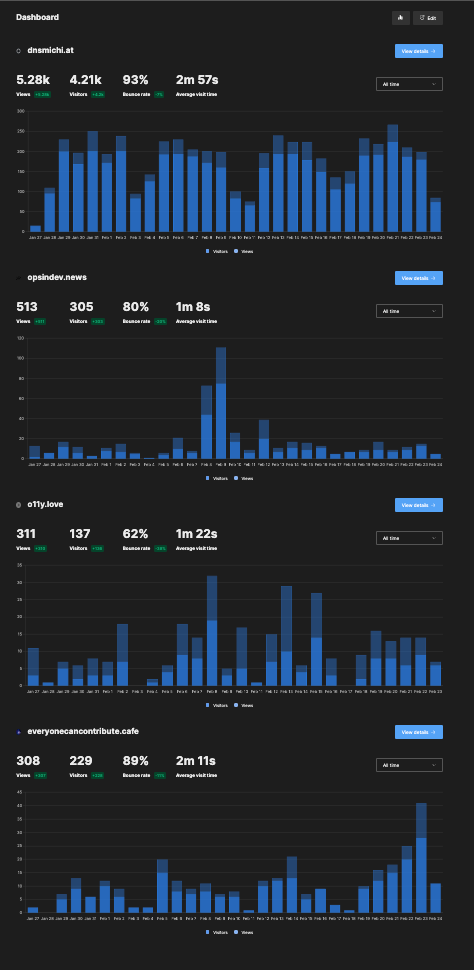
You can also toggle the charts to only see numbers and trends.
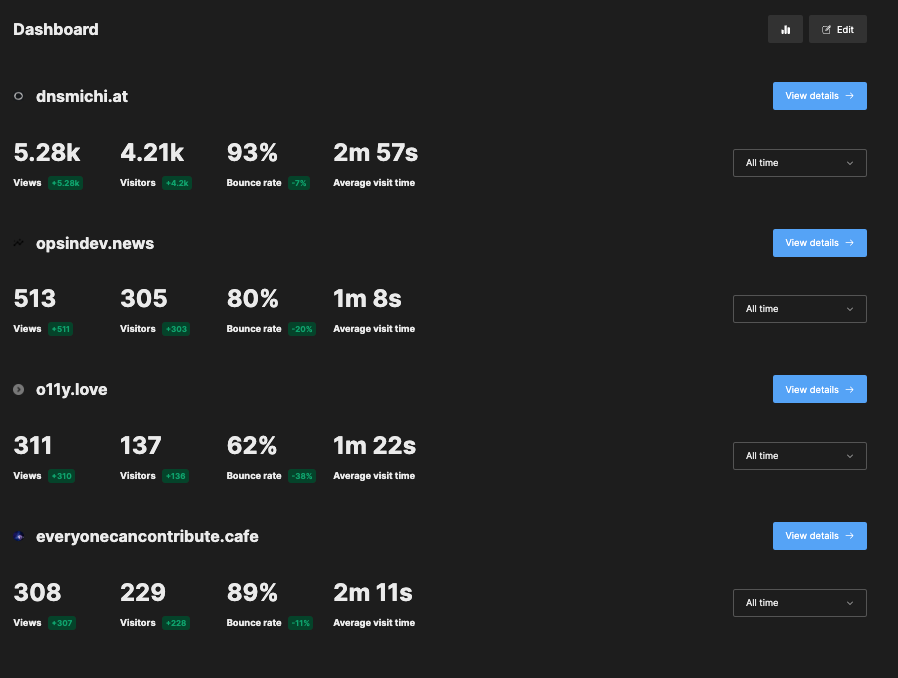
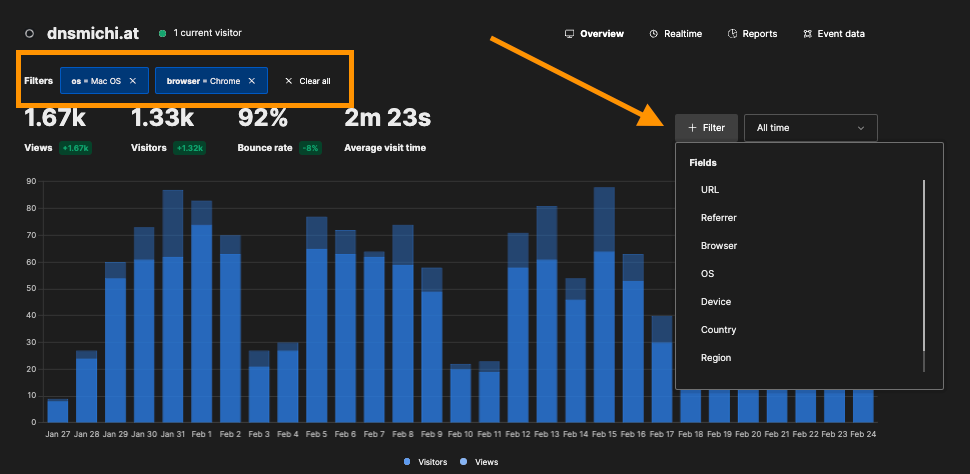
Detailed view
The detail view for each website provides chart range, and filter options. You can also switch to the Realtime view.
There are multiple sections to explore: Pages and Views, Referrers.
Browsers/Visitors, OS/Visitors, Devices/Visitors and geographical location.

Each section has a More action which provides more granular filter options.
Based on the data inspection, you can create view filters, for example filter by all macOS users with Chrome.
Reports
You can create custom reports based on the filtered data: Insights, Funnel, Retention.
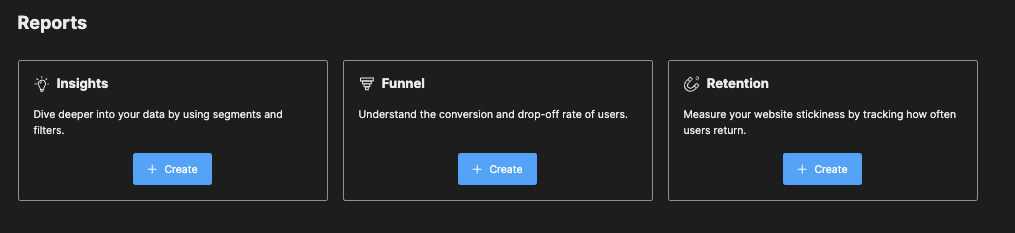
For example, create insights into Page titles and views in the country: Austria.

Configuration
- Tracker configuration: Different send location, Google Tag Manager support, etc.
- Team management: Create teams and assign users to specific website data only. Authentication
Automation API
Any operation through the UI can also be performed through the API. That way you can export the report data as JSON for external analytics systems, or integrate Observability workflows.
More Umami Integrations
Umami provides plugins for Vuepress, Gatsby, Nuxt, Docusaurs, Wordpress and more. The websites shown in the screenshots above use different web applications. The next sections describe them specifically, in case you are using them :)
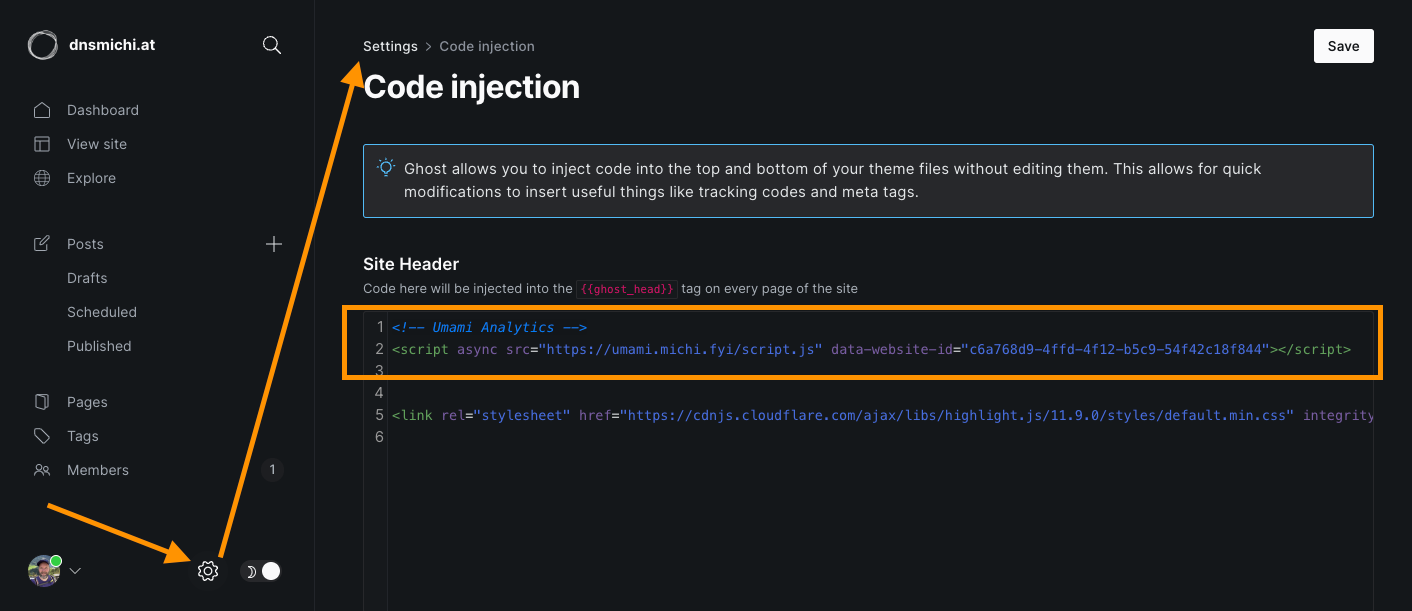
Ghost (this blog)
Ghost supports custom Javascript through Code injection in the settings. Log into Ghost, and select the settings icon at the left bottom, path is /ghost/#/settings. Navigate into Code injection, and add the Umami snippet.
MkDocs with Material theme
Material for MkDocs requires specific overrides with extrahead in the main section, called "overriding blocks" in the docs.
- Create a new directory
overridesand filemain.html - Copy the content below, and modify the Umami integration. The code extends the
base.htmland adds an extrahead block. I have added additional code for setting the page title correctly. You can also use the{{ super() }}method explained in the docs.
{% extends "base.html" %}

{% block extrahead %}
  {% set title = config.site_name %}
  {% if page and page.meta and page.meta.title %}
    {% set title = title ~ " - " ~ page.meta.title %}
  {% elif page and page.title and not page.is_homepage %}
    {% set title = title ~ " - " ~ page.title %}
  {% endif %}

  <!-- Umami analytics, https://squidfunk.github.io/mkdocs-material/customization/#overriding-blocks -->
<script async src="https://umami.michi.fyi/script.js" data-website-id="ad71bbd0-1f16-40e5-bb0d-0a11cfa50a45"></script>

{% endblock %}
3. Modify the .mkdocs.yml configuration file, add the custom_dir path.
theme:
  name: material
  custom_dir: overrides
See this MR example. More working examples are available in
- https://gitlab.com/everyonecancontribute/observability/o11y.love
- https://gitlab.com/dnsmichi/opsindev.news
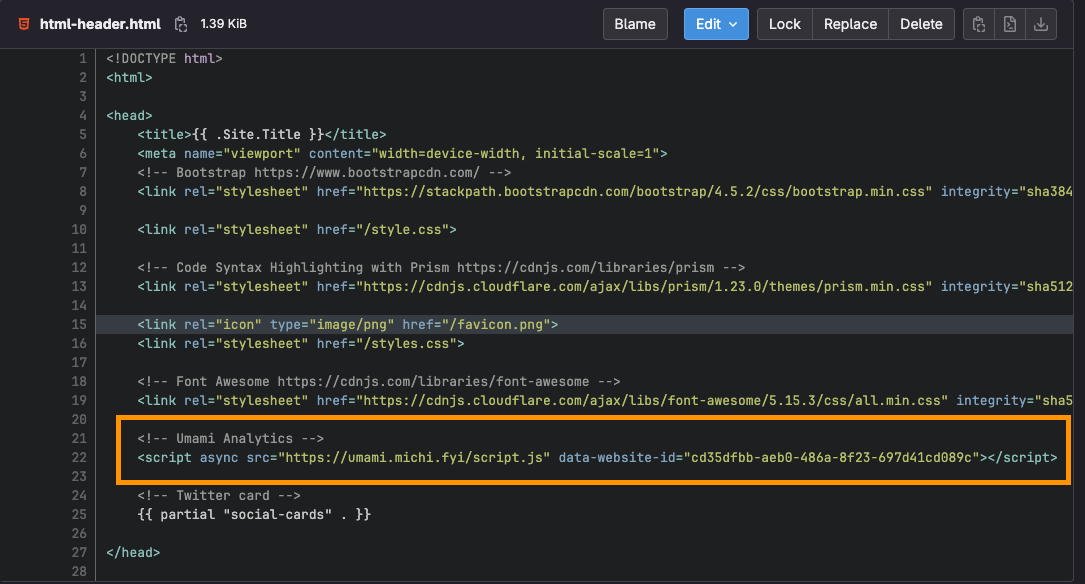
Hugo
The https://everyonecancontribute.cafe/ meetup website uses Hugo with a custom theme. Inside the theme directory, the path layouts/partials/html-header.html or otherwise should exist with <head> section. Copy paste the Umami snippet there. Alternatively, create a custom analytics partial following this tutorial.
Umami Setup
You can subscribe to their SaaS cloud version and start using Umami. Alternatively, you can self-host the open source project. Fortunately, there is a containerized docker compose setup available, defaulting to PostgreSQL.
Before automating the setup, I created a blank Ubuntu 22 VM, installed docker and docker compose, cloned the Git repository and started the default configuration.
git clone https://github.com/umami-software/umami.git
cd umami
docker compose up -d
docker ps
After inspecting the web interface on port 3000 (<IP address>:3000), and the running containers, I started looking into how to setup an Nginx TLS proxy in front of Docker. Either managed through Ansible, or in Docker itself with automated renewal from Lets Encrypt through ACME DNS or HTTP challenges.
The next sections describe the final working setup with OpenTofu/Ansible in a Hetzner Cloud VM. You can modify the configuration for your own use case, or only use the parts with Ansible templates and docker provisioning. TLS certificates are managed with Nginx-proxy and its ACME companion for Lets Encrypt.
Disclaimer: I'm still learning OpenTofu and Ansible. The implementation might not be perfect, and requires your review for production usage. The configuration is tested against IaC security scanners, see the .gitlab-ci.yml configuration.
Hetzner Cloud VM with OpenTofu
Note: The OpenTofu setup is specific to Hetzner Cloud, while the Ansible playbooks below should work with any Ubuntu 22.04 LTS VM.
Note 2: I decided to use OpenTofu on the CLI (tofu) instead of Terraform. HashiCorp changed the Terraform to not-open-source BuSL as license, and recently sent a cease&desist letter to OpenTofu.
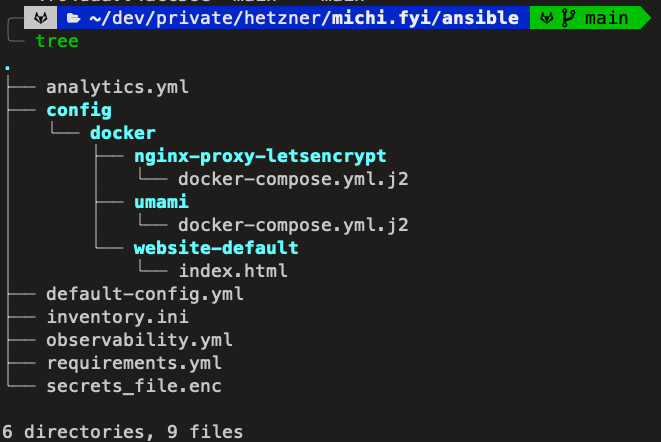
Create a new directory called terraform/ or clone my project and modify for your environment. Follow best practices for directory and file layout:
versions.tfto specify the required providerhetznercloud/hcloud
terraform {
  required_providers {
    hcloud = {
      source = "hetznercloud/hcloud"
      version = "1.45.0"
    }
  }
}
2. variables.tf to configure the hcloud_token variable marked as sensitive. Its value will be provided by terraform.tfvars which is not added to the Git repository.
variable "hcloud_token" {
    sensitive = true
}
3. terraform.tfvars to specify the hcloud_token variable value (added to .gitignore).
hcloud_token = "xxx"4. user-data-michi-fyi.yml for cloud-init configuration for Hetzner Cloud. The file name is intentional for my use case, rename it to your environment.
cloud-init helps make the initial VM provision more secure: Set up a local user with SSH keys, harden SSH login (no root), install and configure fail2ban and ufw as firewall. Replace <fqdn>, <sshkey> and <username> in the example below.
#cloud-config
fqdn: <fqdn>
hostname: <fqdn>
locale: en_US.UTF-8
timezone: Europe/Berlin
users:
  - name: <username>
    groups: users, admin
    sudo: ALL=(ALL) NOPASSWD:ALL
    shell: /bin/bash
    ssh_authorized_keys:
      - <sshkey>
package_update: true
package_upgrade: true
package_reboot_if_required: true
packages:
  - fail2ban
  - ufw
runcmd:
  - ufw allow 'Nginx HTTP'
  - printf "[sshd]\nenabled = true\nbanaction = iptables-multiport" > /etc/fail2ban/jail.local
  - systemctl enable fail2ban
  - systemctl start fail2ban
  - ufw allow 'OpenSSH'
  - ufw enable
  - sed -ie '/^PermitRootLogin/s/^.*$/PermitRootLogin no/' /etc/ssh/sshd_config
  - sed -ie '/^PasswordAuthentication/s/^.*$/PasswordAuthentication no/' /etc/ssh/sshd_config
  - sed -ie '/^X11Forwarding/s/^.*$/X11Forwarding no/' /etc/ssh/sshd_config
  - sed -ie '/^#MaxAuthTries/s/^.*$/MaxAuthTries 2/' /etc/ssh/sshd_config
  - sed -ie '/^#AllowTcpForwarding/s/^.*$/AllowTcpForwarding no/' /etc/ssh/sshd_config
  - sed -ie '/^#AllowAgentForwarding/s/^.*$/AllowAgentForwarding no/' /etc/ssh/sshd_config
  - sed -ie '/^#AuthorizedKeysFile/s/^.*$/AuthorizedKeysFile .ssh/authorized_keys/' /etc/ssh/sshd_config
  - sed -i '$a AllowUsers <username>' /etc/ssh/sshd_config
  - systemctl restart ssh
5. main.tf to configure the provider with the token attribute.
provider "hcloud" {
    token = var.hcloud_token
}
Additionally, create a new resource for hcloud_server and specify the Hetzner Cloud specific attributes: name (add your FQDN), image (ubuntu-22.04 is LTS), server_type (cx41 = Shared vCPU x86, 4 vCPUs, 16 GB RAM), location (nbg1 = Nuremberg), public_net (enable IPv4 and IPv6), labels, user_data (reference the cloud-init config file).
resource "hcloud_server" "web" {
    name = "<fqdn>"
    image = "ubuntu-22.04"
    server_type = "cx41" # https://www.hetzner.com/cloud/
    location    = "nbg1"

    public_net {
        ipv4_enabled = true
        ipv6_enabled = true
    }

    labels = { "os" = "ubuntu" }

    # Hetzner cloud-init
    user_data = "${file("user-data-michi-fyi.yml")}"
}
6. output.tf to parse the plan execution results in a readable way.
output "web_server_status" {
  value = hcloud_server.web.status
}

output "web_server_ips" {
  value = {
    name = hcloud_server.web.name
    ipv4 = hcloud_server.web.ipv4_address
    ipv6 = hcloud_server.web.ipv6_address
  }
}
Apply plan and provision cloud resources
tofu plan -out tf.plan
tofu apply tf.plan
Example output:
hcloud_server.web: Creating...
hcloud_server.web: Creation complete after 8s [id=42593855]
Apply complete! Resources: 1 added, 0 changed, 0 destroyed.
Outputs:
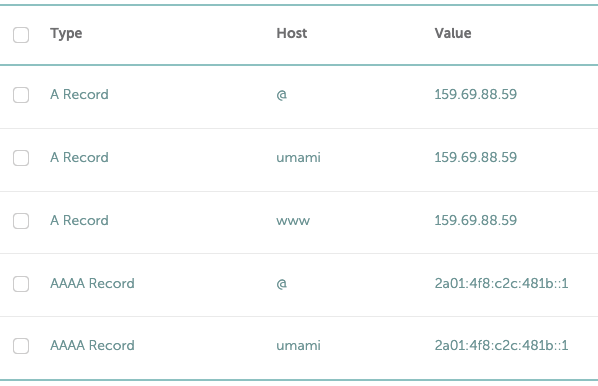
web_server_ips = {
"ipv4" = "159.69.88.59"
"ipv6" = "2a01:4f8:c2c:481b::1"
"name" = "michi.fyi"
}
web_server_status = "running"DNS Setup
I'm using Namecheap for DNS registration and management, and there is an API and Terraform provider available, but it requires whitelisting an IP address. Coming from a dynamic range ISP (DTAG), I decided to not bother and manage the IPv4 and IPv6 address manually in the web dashboard only once.
While testing different Umami setups, I also decided to use a dedicated umami.fqdn sub domain. I will explore automation in future blog posts.
Ansible (Docker Compose, Nginx proxy, Umami)
The Ansible configuration takes care of
- Base system packages (git, vim, wget, curl, htop) installation.
- Unattended upgrade configuration on Ubuntu, using the hifis.unattended_upgrades Ansible role.
- Setup Docker and Docker Compose, using the geerlingguy.docker Ansible role.
- Deploy Docker compose assets and configuration
Create a new directory called ansible/ or clone my project and modify it for your environment.
Ansible requirements
Create a new file requirements.yml and specify the roles and collections.
roles:
- name: cloudalchemy.prometheus
- name: geerlingguy.docker
- name: hifis.unattended_upgrades

collections:
- name: community.general
Install the requirements from Ansible Galaxy.
cd ansible
ansible-galaxy install -r requirements.yml
Default configuration playbook
The default configuration takes care of installing a list of base packages (git, vim, wget, curl, htop), and enables unattended upgrades.
Replace <user> with your SSH login user the following example, source here.
---
- name: Base Server Setup
  hosts: all
  remote_user: <user>
  become: true
  become_method: ansible.builtin.sudo
  roles:
  - role: hifis.unattended_upgrades
    unattended_origins_patterns:
    - 'origin=Ubuntu,archive=${distro_codename}-security'
    - 'o=Ubuntu,a=${distro_codename}'
    - 'o=Ubuntu,a=${distro_codename}-updates'
    - 'o=Ubuntu,a=${distro_codename}-proposed-updates'
    unattended_package_blacklist: [cowsay, vim]

  vars:
    packages:
      - git
      - vim
      - wget
      - curl
      - htop
  tasks:
    - name: Ensure a list of packages installed
      ansible.builtin.apt:
        name: "{{ packages }}"
        state: present

    - name: All done!
      ansible.builtin.debug:
        msg: Packages have been successfully installed
Umami and Nginx proxy playbook
You can manage Umami and the Nginx proxy with Ansible. If you have an Nginx proxy setup already, you can skip ahead into the Umami section.
The setup requires Docker, using the Geerlingguy.docker role. The playbook provisions docker-compose configuration, and required assets, as Jinja templates. This allows to provision variables managed with Ansible.
  vars:
    default_vhost: "fqdn"
    umami_vhost: "umami.fqdn"
    acme_default_email: "abc@def.com"
Docker compose: Nginx proxy
The Nginx proxy setup puts a container in front of all HTTP/80 and 443 traffic. It requires outside volumes for configuration, vhost, html data, dhparam, and certificate access. The Docker socket access is needed for reading the environment variables from spawned containers. You only need to specify the VIRTUAL_HOST environment variable in new containers to automatically route the traffic.
Since Hetzner Cloud fully supports IPv6, the environment variable ENABLE_IPV6 enables this specifically.
  nginx-proxy:
    image: nginxproxy/nginx-proxy
    container_name: nginx-proxy
    restart: always
    ports:
      - "80:80"
      - "443:443"
    volumes:
      - conf:/etc/nginx/conf.d
      - vhost:/etc/nginx/vhost.d
      - html:/usr/share/nginx/html
      - dhparam:/etc/nginx/dhparam
      - certs:/etc/nginx/certs:ro
      - /var/run/docker.sock:/tmp/docker.sock:ro
    environment:
      - ENABLE_IPV6=true
    networks:
      - nginx-proxy
Volumes
volumes:
  conf:
  vhost:
  html:
  dhparam:
  certs:
  acme:
Nginx proxy network
Communication between Nginx proxy contains requires the nginx-proxy network. This network is created in the nginx-proxy docker-compose.yml and can be used for any other docker compose setup on the same host.
networks:
  nginx-proxy:
    name: nginx-proxy
The container service definition requires
    networks:
      - nginx-proxy
Nginx proxy ACME companion for Lets Encrypt certificates
The acme-companion container takes care of TLS certificate requests and renewals. It needs write access to an outside certs volume, and requires read-only access to the docker socket to inspect newly started containers and their environment.
As long as you specify VIRTUAL_HOST and LETSENCRYPT_HOST for all docker compose containers, the ACME companion will take care of TLS certificate requests and renewal with Lets Encrypt. This also works for sub-domains.
  acme-companion:
    image: nginxproxy/acme-companion
    container_name: nginx-proxy-acme
    restart: always
    environment:
      - DEFAULT_EMAIL={{ acme_default_email }}
    volumes_from:
      - nginx-proxy
    volumes:
      - certs:/etc/nginx/certs:rw
      - acme:/etc/acme.sh
      - /var/run/docker.sock:/var/run/docker.sock:ro
    networks:
      - nginx-proxy
The Ansible Jinja template for docker-compose.yml uses the default_vhost and acme_default_email variables to specify them as Ansible variables.
Test the setup with a default website
The Ansible playbook provisions some sample data into /docker/website-default
The default website needs a TLS certificate for www and root domain, specified with VIRTUAL_HOST and LETSENCRYPT environment variables for the Nginx Proxy ACME compantion. The default_vhost variable is provisioned from Ansible into the docker-compose configuration. Communication is done through the nginx-proxy network.
  # default website
  website:
    image: nginx:alpine
    container_name: website
    restart: always
    volumes:
      - /docker/website-default:/usr/share/nginx/html:ro
    environment:
      - VIRTUAL_HOST=www.{{ default_vhost }},{{ default_vhost }}  # your domain
      - LETSENCRYPT_HOST=www.{{ default_vhost }},{{ default_vhost }}
    networks:
      - nginx-proxy
You can inspect the full docker-compose configuration and Ansible playbook to learn more. is available here.
Docker Compose: Umami
The upstream Umami docker-compose setup uses PostgreSQL, and comes with two services. You can test and run this setup on any host with Docker compose.
Adding Umami into an Nginx proxy setup requires the following changes:
- Change the ports with
3000to127.0.0.1:3000:3000(does not need to listen on 0.0.0.0) - Read the
.envfile for secrets and connection handling - Add
VIRTUAL_HOSTandLETSENCRYPT_HOSTas environment variables for Nginx proxy ACME companion for automated TLS certificates. - Remove the
APP_SECRET,POSTGRES_DB,POSTGRES_USER,POSTGRES_PASSWORDenvironment variables, this is provisioned and exported through.env. - Add the
proxynetwork as external network, usingnginx-proxyto route all traffic. Thedefaultnetwork is local only between the Umami and database container.
The docker-compose Jinja template is located here.
Umami container
  umami:
    image: ghcr.io/umami-software/umami:postgresql-latest
    ports:
      - "127.0.0.1:3000:3000"
    env_file: .env
    environment:
      VIRTUAL_HOST: {{ umami_vhost }}
      LETSENCRYPT_HOST: {{ umami_vhost }}
    depends_on:
      umami-db:
        condition: service_healthy
    healthcheck:
      test: ["CMD-SHELL", "curl http://localhost:3000/api/heartbeat"]
      interval: 5s
      timeout: 5s
      retries: 5
    networks:
      - default
      - proxy
    restart: always
Umami database container
  umami-db:
    image: postgres:15-alpine
    ports:
      - "127.0.0.1:5432:5432"
    env_file: .env
    volumes:
      - umami-db-data:/var/lib/postgresql/data
    healthcheck:
      test: ["CMD-SHELL", "pg_isready -U $${POSTGRES_USER} -d $${POSTGRES_DB}"]
      interval: 5s
      timeout: 5s
      retries: 5
    networks:
      - default
    restart: always
Volumes
volumes:
  umami-db-data:
Networks
networks:
  net:
    name: default

  proxy:
    name: nginx-proxy
    external: true
The docker-compose Jinja template is located here.
Before provisioning with Ansible, the setup also requires secrets and database connection handling setup in the next sections. If you want to iterate faster, you can hardcode the secrets first and add the advanced automation steps in a second step. This is also my learning curve.
Umami secrets
The database username requires a password. I strongly recommend to not use the default value, and instead use the Ansible vault to manage the secret.
- Store the
postgres_passwordvariable value safely in your password manager (1Password, etc.) - Ansible Vault encryption will ask for a password. Store it safely in your password manager, too.
cd ansible

vim secrets_file.enc

postgres_password: XXX

ansible-vault encrypt secrets_file.enc
The encrypted secrets_file needs to be passed to the Ansible CLI command like this:
ansible-playbook -i inventory.ini -e @secrets_file.enc --ask-vault-pass analytics.yml Umami app secret
Umami requires an application secret which can either be provisioned through the Ansible vault, or regenerated at provision time. I chose to generate the secret on every Ansible provision run because it only is used internally, and I am a fan of rotating secrets often.
    - name: Generate random string for umami secret
      ansible.builtin.set_fact:
        secret_key: "{{ lookup('community.general.random_string', upper=false, numbers=false, special=false, length=16) }}"
      no_log: true
Umami database setup
For connection handling, Ansible provisions an .env file with connection and authentication environment variables. The .env file is stored in a Jinja template to replace the Ansible variables secret_key (from playbook) and umami_postgres_password (from vault).
DATABASE_URL=postgresql://umami:{{ umami_postgres_password }}@umami-db:5432/umami
DATABASE_TYPE=postgresql
APP_SECRET={{ secret_key }}

POSTGRES_DB=umami
POSTGRES_USER=umami
POSTGRES_PASSWORD={{ umami_postgres_password }}

# Force auth method to scam-sha-256 instead of md5
POSTGRES_INITDB_ARGS="--auth-host=scram-sha-256"
POSTGRES_HOST_AUTH_METHOD=scram-sha-256
The .env file is read by docker-compose containers using the env_file: .env
  umami-db:
    image: postgres:15-alpine
    ports:
      - "127.0.0.1:5432:5432"
    env_file: .env
The database will be located in /var/lib/docker/volumes/umami_umami-db-data/ depending on the container service name.
If you need to debug database connections, you can use a local PostgreSQL client image:
docker run -dit --network=umami_default --name=pgclient codingpuss/postgres-client

source .env

docker exec -it pgclient psql $DATABASE_URL -c 'select * from pg_catalog.pg_tables'
psql: error: FATAL:  password authentication failed for user "umami"
Ansible provision, finally
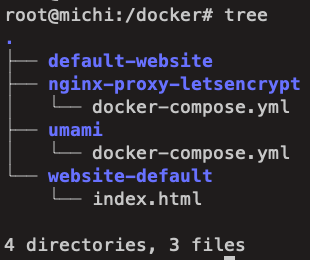
You should have the following directory structure for Ansible, following this blog post. If not, inspect https://gitlab.com/dnsmichi/michi.fyi
If you have an Nginx proxy setup already, please remove the sections with nginx-proxy-letsencrypt in the Ansible playbook.
Run the playbook to provision the docker-compose configuration and assets, and provide the vault password when asked.
ansible-playbook -i inventory.ini -e @secrets_file.enc --ask-vault-pass analytics.ymlSSH into the host, and become root.
ssh fqdn
sudo -i
Docker compose up
Navigate into the /docker directory, and the respective docker-compose tree.
Start nginx-proxy-letsencrypt and umami
cd nginx-proxy-letsencrypt/
docker compose up -d

# wait until the containers show up as healthy
docker compose ps
cd ..

cd umami
docker compose up -d

# wait until the containers show up as healthy
docker compose ps
cd ..
More help Docker compose commands below:
# Start services in background
docker compose up -d

# Status
docker compose status

# Restart all containers
docker compose restart

# Stop all containers
docker compose down

# Update container images
docker compose pull
Service start after reboot
Reboots after Kernel upgrades require the containers to be restarted. The restart: always attribute for services in the docker-compose.yml file takes care after running docker compose up -d for the first time.
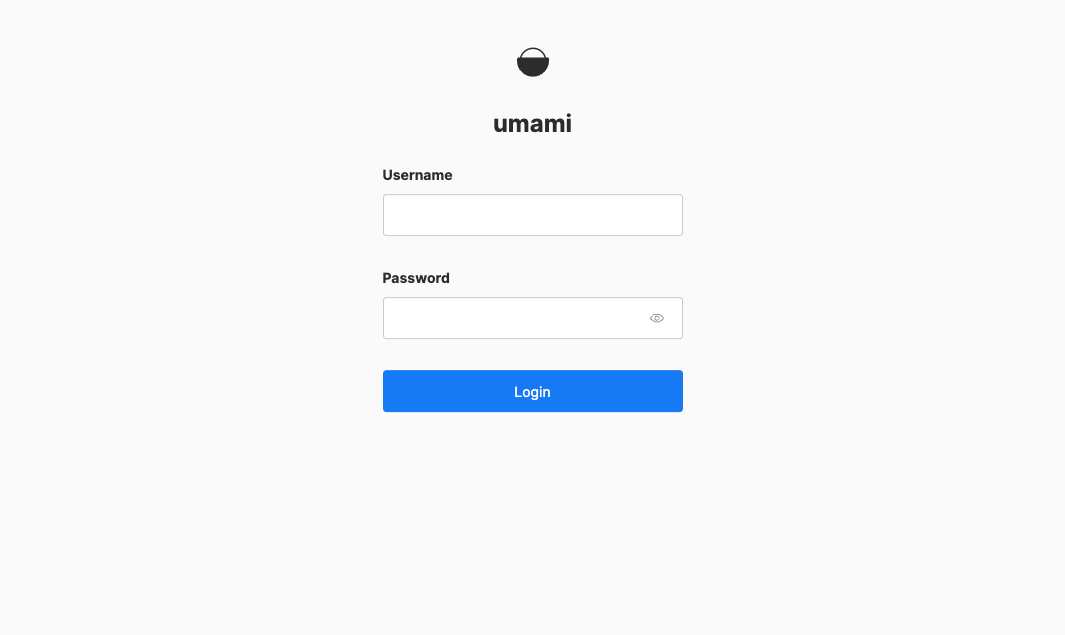
Verify Umami working
Open a webbrowser and navigate to your Umami FQDN or sub domain. You should be greeted by the account creation form. Create a strong password with your password manager. Close the browser, and open it again to login.
Next, start exploring Umami. Navigate back to the top of this blog post to learn about website integrations with MkDocs, Ghost and Hugo.
Conclusion
Umami is a lightweight web analytics platform, fully open source and GDPR compliant without cookie banners. You can either use Umami as SaaS service, or self-host. The containerized setup can be automated with docker compose and Ansible. Provisioning a Linux host VM can be achieved using OpenTofu.
If you want to contribute to Umami, dive into the source code and create a pull request. The maintainers are working with a stable master , next dev Git branch workflow.
After running Umami for 4 weeks now, I see AI and CI/CD topics trending at the top 56% of views (my two main work focus areas in 2024). This helps refine my public learning strategy on my personal blog, when not publishing on the GitLab blog :)

Overall, my impression is very positive, and I will continue using Umami in production. Next to exploring Google Analytics alternatives, I was able to expand my knowledge with Ansible and OpenTofu, and how TLS certificate renewal can be done with containers.
PS: An alternative approach for traffic routing and TLS handling with Nginx proxy can be Traefik, described in this blog post by Daniel Bodky:
 Daniel Bodky